Posts

CMTimeMakeWithSeconds explained

Image
CMTime  is structure which has two main components,  timeScale  and  value. CMTIME = VALUE  / TIMESCALE where, TimeScale =  fraction of a second each unit in numerator occupies. CMTIME = Value / TimeScale 1)  public   func  CMTimeMake( _  value:  Int64 ,  _  timescale:  Int32 ) ->  CMTime CMTimeMake ( 6000 ,  10 ) Means, there are 6000 units , each unit occupies 1/10 of a second 2)  public   func  CMTimeMakeWithSeconds( _  seconds:  Float64 ,  _  preferredTimescale:  Int32 ) ->  CMTime CMTimeMakeWithSeconds(10.0,500) 10.0 = VALUE /500 Therefore VALUE = 5000 So, there are 5000 units, each occupy 1/500 of a second

UILabel dynamic height with Autolayout

Image
Adding a UILabel to UIScrollView and with a couple of lines of code you would be able to achieve the dynamic height. But, there is one more way and thats without writing a single line of code. So, lets get started on it. Approach 1: Mistakes that we would make is explained below. (UILabel and UIScrollView) Add a UIScrollView , set top, left, bottom, right margin set to 0 against superview as per your requirement. Add the UILabel and we do the same for UILabel (top,left,bottom,right margin set to 0 with respect to SuperView, which is UIScrollView ) With this approach scrollview would not get idea on the scroll limits. It will set the content size, where it would scroll horizontally. You can still go with this approach. Explained in conclusion. Approach 2: Now, lets go with the correct way to Code .  It includes the following hierarchy UIView -> UIScrollView -> UILabel. Step 1  : Add the UIView , set the margin according. Here I ...

Can we animate "shadowOpacity" using UIView animation block?

We are pretty much used to the UIView animation block for properties like frame and transforms. + ( void )animateWithDuration:( NSTimeInterval )duration animations:( void (^)( void ))animations Lets say there is a UIView *userView and you would like to show animation of shadow turned on or off.     [ UIView animateWithDuration :01 animations :^{         if (showShadow){             self.userView. layer . shadowOpacity =0.5;         } else {             self.userView. layer . shadowOpacity =0.0;         }     }]; The above code is not going to work. UIView animates  frame, bounds, center, tranform, alpha, background Color and contentStretch.i.e simple animation. The View Programming guide - Animations  url gives more details on it.  It does not animate layer properties...

UITableView with Keyboard handling for UITextFields

UITableView has its parent class as UIScrollView. So, if you have a UITableViewCell , which has UITextField, then it needs to handle the contentOffset. More details on contentOffset  ( another url )and keyboard handling   in iOS. Lets say if we want to add a bottom inset of 216 (approx. kyeboard height). the following would be the code You basically change the content Offset while the content size remains the same. self.contentOffset = UIEdgeInset(0,0,216,0). This will move the content ( in the UITableView) up by 216. The below code also handles autosuggestion bar ,  as the autosuggestion delta (approx. 29) gets added to existing delta. And Removes it accordingly. -( void )viewWillAppear:( BOOL )animated{     [ super viewWillAppear :animated];     [ self   registerNotifications: YES ]; } -( void )viewWillDisappear:( BOOL )animated{     [ super viewWillDisappear :animated];     [ self   regis...

Change height of the UISegmentedControl

Image
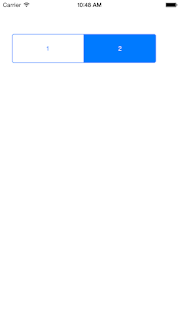
UISegmentedControl changing height is sometimes difficult to find. It can be easily done if you are using constraints. In case if you don't use constraints , I tried the following approach which I though would work, but actually it did not. - ( void )viewDidLoad {     [ super viewDidLoad ];      CGRect rect= self . seg_cntrl . frame ;     rect. size . height =60.0;     [ self . mySegmentControl setFrame :rect]; } Later on I found if you try to create a UISegmentedControl object using a code and then set the Frame it  will consider the height that you set. - ( void )viewDidLoad {     [ super viewDidLoad ];          UISegmentedControl *seg=[[ UISegmentedControl alloc ] initWithItems :@[ @"1" , @"2" ]]     ;     [seg setFrame : CGRectMake (25.0, 70.0, 300.0, 60.0)];     [ self . view addSubview :seg]; } The r...

How to set Custom Section Header in UITableView for ios sdk version greater than 6

Image
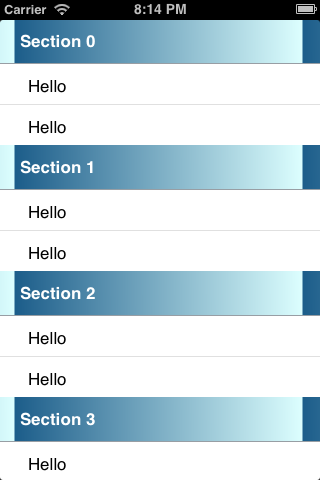
Dear Friends, As we know, that to set a custom Section Header in a TableView we need to call the following. Here we pass our own custom View. But, remember the view which we returned was never reusable, hence not memory efficient. -( UIView *) tableView:( UITableView *)tableView viewForHeaderInSection:( NSInteger )section Later version of iOS , starting from iOS 6, helps to make our code Memory efficient with few lines of code. Still here the delegate method remains the same. With the help of this tutorial we will be able achieve a Custom Header implementation using iOS 6 or greater sdk. We will be creating a app. which would look like as shown below. Please use the following steps to achieve this: Step 1: Create a .xib file for the custom header 1. Press command + N 2. Select User Interface in Left Pane. 3. Then Select a View and name it as TableHeader. Step 2: Create a Custom class for the custom header in Step 1 1. Press command...

Custom Editing Control for UITableViewCell , like iPhone Mail Appliation

Image
Dear Friends, Today, while I was developing a application, I found that I am in need to a custom Editing control. Custom Editing Control are displayed on the left side of the screen. IOS sdk provides two of such kind which we use most of the time UITableViewCellEditingStyleDelete & UITableViewCellEditingStyleInsert  . I will be now discussing the third one, UITableViewCellEditingStyleNone. This can be used to design our own Editing control. How this is going to look like can be fond from below screen shot. Steps to achieve this can be found below: STEP 1: Create A subclass of UITabelViewCell First create a subclass of UITableViewCell, where when the cell object is initialised we will have to add a UIButton to its view. You will also need a offset variable, whose value will be 32.0 in all iPhones. -( id ) initWithCoder:( NSCoder *)aDecoder{          self =[ super initWithCoder :aDecoder];     ...